If you’re wondering how to setup a Discord server, don’t worry, it’s simple and intuitive. You can do it by opening the Discord web interface or by downloading the Discord client on Windows, MacOS or Linux. Whichever method you choose you will need to create a free Discord account.
When you first log in to Discord, you will be prompted to create or join a server. If you have are not new and used Discord before, you can click on the “+” button on the left side of the screen to setup your own Discord server. In both cases, Discord will suggest you to setup your own server.
How To Create And Setup A Discord Server
You can setup a discord server by following these steps:
- If you have used Discord in the past, click on “+“. If you are a new Discord member, you will be prompted to build your own server.

- Click on “Create My Own“.
- Choose one of the two options provided or click SKIP if you are not sure.

- Choose a name for your server and click Create

- That’s it, you have just created a Discord server


Now that you’ve created a Discord server, you can ask your friends to join. If you have friends on Discord you can invite them directly from Discord, they will receive a message to join your server.
You can also generate a Discord invitation link that you can share all over the internet to attract users to your server.
How To Setup Discord Invitations For A Server
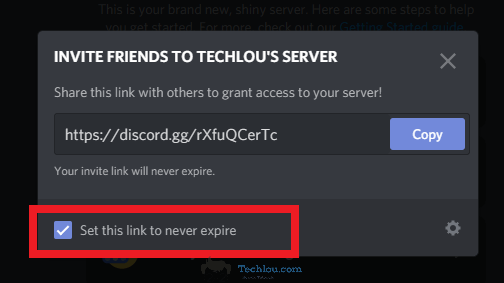
- Click on “Invite Your Friends“
- Choose the option “Set this link to never expire” (This feature will allow users to join your Discord server at any time through the invitation link.)

- Click on Copy
- Share the invitation link with people on the internet
First you can choose the lifetime of your invitation link. We advise you to choose the option “Set this link to never expire“. This feature will allow users to join your Discord server at any time through the invitation link.
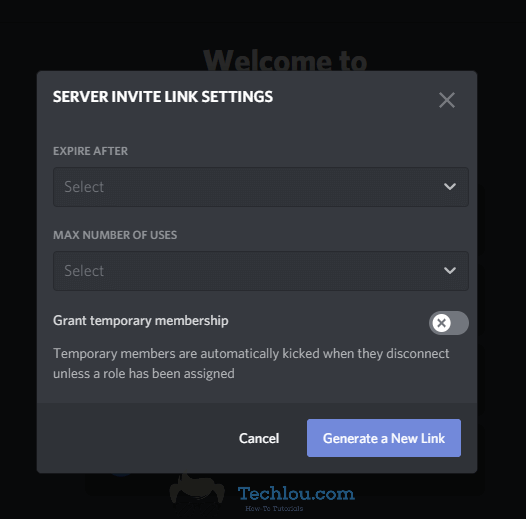
You can also choose the maximum number of times the invitation link can be used. Again, we suggest you choose the “unlimited uses” option so that you can invite as many people as you want to your server.
Finally, you can decide that members who join your Discord server via this invitation link are provisional members. A provisional member will be kicked out once he/she logs out of the server. Unless you have assigned a role to that user.
Once you have configured these options, click on “Generate a new link”. Then simply post and share this link on social networks or forums so that users can join your server.
How To Setup Roles On A Discord Server
Knowing how to set up roles on your Discord server is important because roles allow you to have certain privileges. You want can for example create a “moderator” role. You would give this role permission to ban members and delete posts. Using roles saves you from having to setup specific permissions for each member.
To setup the different roles of your Discord server follow the steps below:
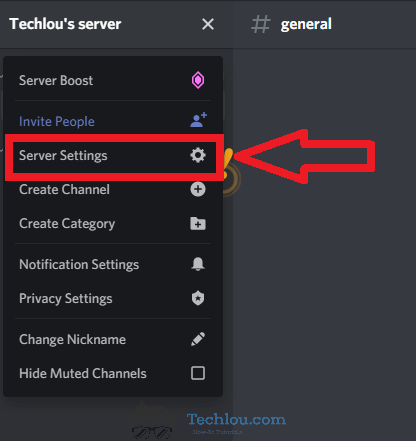
- Go to your server and click on the arrow on the right of your server name;

- Go to “Server settings” then “Roles“;

- You will see the list of roles and permissions of each role. We suggest activating only the following permissions for the @everyone role:
- Change nickname ;
- Read text chat & see voice chat;
- Send messages;
- Embed links;
- Attach files;
- View old messages;
- Connect;
- Talk.
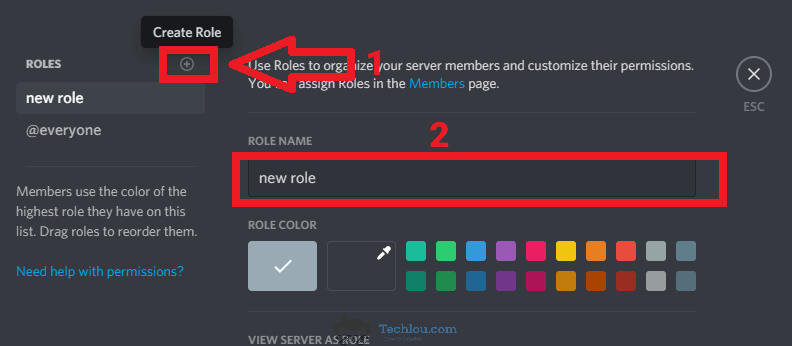
- To new roles, click on the “+” above the list of roles. Then give it a name and set up its permissions as you want.


Once you have finished configuring the different roles, you can assign them to the users. Simply right-click on their name and choose the appropriate role.
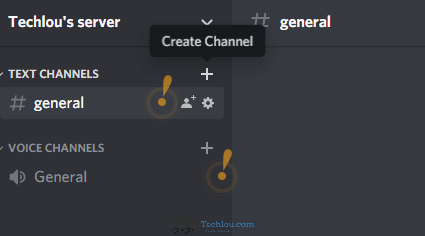
How To Setup Channels On A Discord Server
In order to manage your Discord server well, it is advised to organize it into “channels“, setting up specific and coherent channels allows you to have a clean Discord server and avoid the mess that could result from a large number of users posting a large number of messages. You can for example for a server for students, create a channel for each class, a chat channel, a voice chat channel, etc.
There’s also the option of creating private rooms. These will only be accessible to certain members (depending on the roles).
To create a channel, click on the “+” button next to “Text channels”, enter the name and type of room you want to create (Text or Voice room), and click on Create channel. When creating a channel, you can also choose to make it private by selecting the “Private channel” option.

Manage You Discord Server’s Moderation
You can assign the role of “moderator” and the related permissions to certain users to manage your server. However, there are other ways to simplify the moderation of your server.
To avoid spam on a public Discord server, you can set up auto-moderation under the “Moderation” tab in the server settings.
Discord is a very practical tool for sharing files, media, etc.
However, in order to prevent the publication of “explicit” content, we encourage you to enable automatic media scanning for members without a role.
We also suggest that you setup a “Server Rules” channel on your Discord server. Describe in this channel precisely the different rules to respect on your server. It is important that this channel is configured in “read-only” mode, i.e. that users are not allowed to write on this channel. You can also setup your server so that new users arrive directly on this channel when they join your discord server.
And finally you should know that there are moderation bots that can help you manage your server.
See also:


