If you can’t change the auto-lock setting on iPhone because it’s greyed out and not working then you won’t be able to change auto lock options like the duration. In this article, we will see why auto-lock on iPhone not working or the never option is missing on iOS 12 and iOS 13. Follow the steps below to find why auto lock is greyed out and how to fix it on iPhone.
Auto Lock being greyed out on iPhone is due to Low Power Mode being activated. You have to turn off Low Power Mode in order to be able to change Auto Lock options.
What Is Auto Lock On iPhone
The Auto–lock setting on the iPhone is a feature that allows you to set the amount of time before your iPhone automatically locks and turns off the display. This feature is designed for two main purposes:
- Saving battery life when your iPhone is not being used.
- Security by locking itself (You don’t want someone using your iPhone if you forgot to lock it)
You can change the duration time at which the iPhone auto-lock itself or turn off and completely disable it, but you may experience having the Auto lock setting greyed out, find below why and how to fix this problem.
Why Can’t I Change Auto-lock On My iPhone
If the Low Power Mode is enabled on your iPhone then you will see that the Auto-Lock option is locked at 30 seconds on iPhone. You can’t change Auto lock options unless you turn off Low Power Mode.
Since Low Power Mode’s main purpose is to increase the battery life on iPhone, keeping the Auto-Lock setting on to the lowest value possible (30 seconds) makes sense.
You can’t run Low Power Mode and being able to change auto-lock settings as setting auto-lock to values higher than 30 seconds or “Never” can have a significant impact on battery life thus making Low Power Mode useless. See below to turn off Low Power Mode and how to change auto-lock settings.
How To Fix Auto-Lock Greyed Out on iPhone
Follow the steps below to fix Auto-Lock setting being greyed out due to the Low Power Mode option being activated. Follow the steps below.
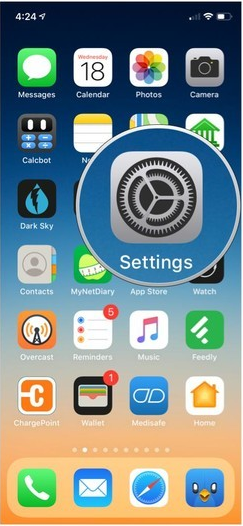
1. Tap on Settings on your iPhone
Tap on Setting to open your iPhone settings.
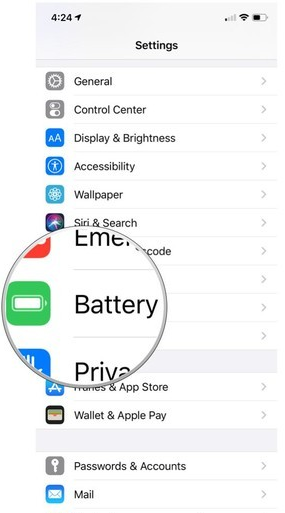
2. Tap on “Battery”
Scroll down the list and tap on Battery
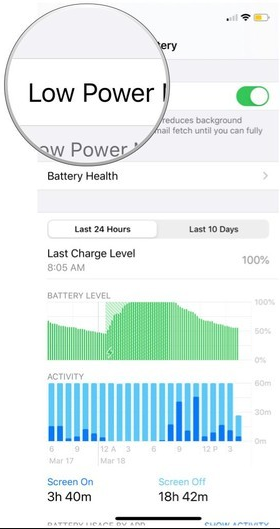
2. Turn off Low Power Mode
Tap on the switch in front of “Low Power Mode” to disable it.
3. Auto-Lock option in not greyed out anymore now.
Now that the Low Power Mode is disabled, Auto-Lock option will become enabled. We will see how to change auto-lock settings on iPhone.
How To Change Auto-Lock on iPhone
Follow the steps below to change auto-lock on iPhone.
1. Tap on Settings
Open your iPhone setting by tapping on the Setting app.

2. Tap on Display and Brightness
Scroll down until you find “Display and Brightness” and tap on it.
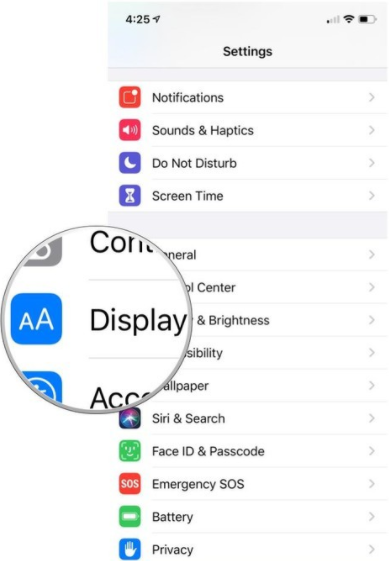
3. Tap on Auto-Lock
Scroll down you options until you find Auto-Lock option and tap on it.

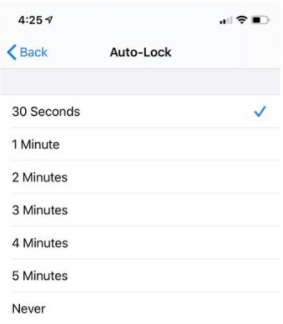
4. Set a period of time before your iPhone locks
From there you can set you desired length of time before your iPhone locks. If you want to completely turn off auto lock tap on “Never“
This is how to how to fix the auto lock being greyed out on iPhone and how to change auto lock.
Be reminded that if you set the timer too high or to “Never” this will have a significant impact on your battery life as well as your security. The iPhone screen is the one thing that consumes the most in battery energy and preventing it from turning off automatically will drain your battery. Also having your iPhone not locking automatically or after a long period is risky if someone has access to your phone before it locks.
See also: How to transfer contacts from Android to iPhone (Easiest)