You may have bought a new graphics card to play some of the modern games in HD or to do some video editing or any other task that requires a lot of graphical resources. In order to take full advantage of this, you need to know how to install a graphics card on your computer properly and safely. We’ll take a look at all of this in this tutorial.
What do you need?
- A graphics card.
- A screwdriver to remove the computer case.
- Dry hands.
Keep your new graphics card in its anti-static bag for as long as possible to reduce the risk of damage due to static electricity.
How To Install A Graphics Card In A PC
Follow the steps below to install a new graphic card on your computer.
Shut down your computer.
Turn off your computer completely, do not put it in standby mode. Unplug its power cable and press the PC’s power button for 30 seconds to drain the remaining power from the motherboard.
Keep your hands dry
Before touching your computer and your motherboard and graphics card, it is important to keep your hands dry to avoid short circuits caused by moisture, liquid or static energy. A simple contact with wet hands can have disastrous consequences on the components of your computer.
Open the computer
Place your computer on the floor or on a table with the left side facing up. Locate the screws on the side panel of your computer and remove them. Now you see the motherboard and all the components of your PC.
Locate the graphics card slot
If your computer already has a graphics card, locate it, you will find it at the bottom left of the motherboard in a PCIe slot. It’s a slot designed for a graphics card on your computer. If you don’t have a graphics card installed yet, look for a slot similar to the one shown in this image.
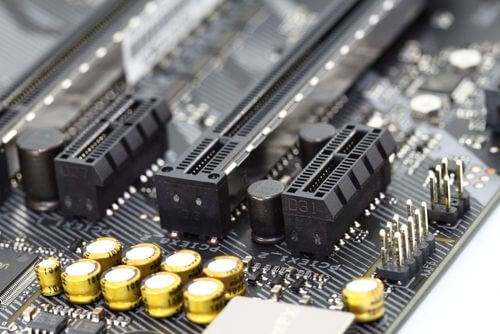
You can also locate the correct port for your graphics card using the puzzle method. Simply try to find a slot where your graphics card can be inserted.
Please note that there are several types of graphics card slots, Finding the right slot depends on the graphics card you have acquired and the motherboard of your PC.
Remove the old graphic card
You must remove the old card from your PC before installing a new graphics card on your computer. Start by removing the screw attached to the metal plate on the back of the graphics card. Once the screw is removed, grab the graphics card with your fingers by the sides and gently pull it out. Often you must first unlock the graphics card by unlocking a hook on the right side of the graphics card. Don’t force it until you are sure you have unlocked the graphics card from its slot.
If there is no graphics card in your computer yet then remove the metal plate behind the appropriate PCIe slot. You can do this by removing the screw on the metal plate that hides the PCIe slot.
You can skip this step if you do not have a graphic card that is already installed on your computer.
Install the new graphics card
Now carefully take the graphics card and place it in the PCIe expansion slot. Push it in slowly and firmly. Don’t push too hard or you may damage the card or your motherboard. If your motherboard has a locking system, activate it to lock your graphics card. If your card has a slot on the left to screw it to the PC, use your screwdriver to lock it.
Close your computer and re-plug it
After having verified that your graphic is well installed and well inserted in its place, close your computer by putting back its cover and put back its screws.
Install the graphics card drivers
Turn on your computer, insert the CD provided with your graphics card and start the driver installation. The installation of the graphics card drivers is mandatory, you will not be able to use your graphics card to its full potential if no drivers are installed or if your drivers are not up to date.
Follow the driver installation guide provided with your graphics card CD or on the paper manual of your graphics card. Usually, you just have to double-click on the icon of your DVD drive on Windows to proceed to the installation.
Restart your computer
Once your graphics card drivers are installed, restart your computer, often you will notice a change in your screen resolution indicating that your new graphics card is installed. You can check that the driver is installed by looking in the device manager on Windows 10
Conclusion
Installing a graphics card on a computer is not a particularly difficult task, you just have to be careful not to damage your hardware by working on a metal surface or with sweaty or wet hands. Make sure your card is fully inserted and the drivers are installed and you are good to go. Now you can enjoy the full capabilities of your new graphics card by running games that require a lot of resources and testing your new acquisition.
FAQ
My Screen went black after installing a new graphic card
If your screen is black after installing a new graphics card, check if the graphics card is fully inserted into its slot and that it is not loose on either of its sides. Also, check that there is no dust inside PCIe slot on the motherboard as dust can cause a bad contact preventing your graphics card from working which causes a black screen.
How to install a graphics card without a CD
If you don’t have the graphic card CD, you can download the drivers of your graphics card model from the manufacturer website.
Why does my monitor say no signal?
If your display shows “No signal” it means that your display is not receiving any data from its VGA or HDMI cable. First, make sure that the graphics card is properly installed in its slot and that the cable connecting the monitor and the graphics card is properly connected, remove the cable and put it back in.
See also: