Windows 10 comes with a default selection of fonts. However, if you want something that is not quite right for your document, you can install fonts in Windows 10 so you can use them on softwares like Photoshop or to make your word documents original and truly stand out.
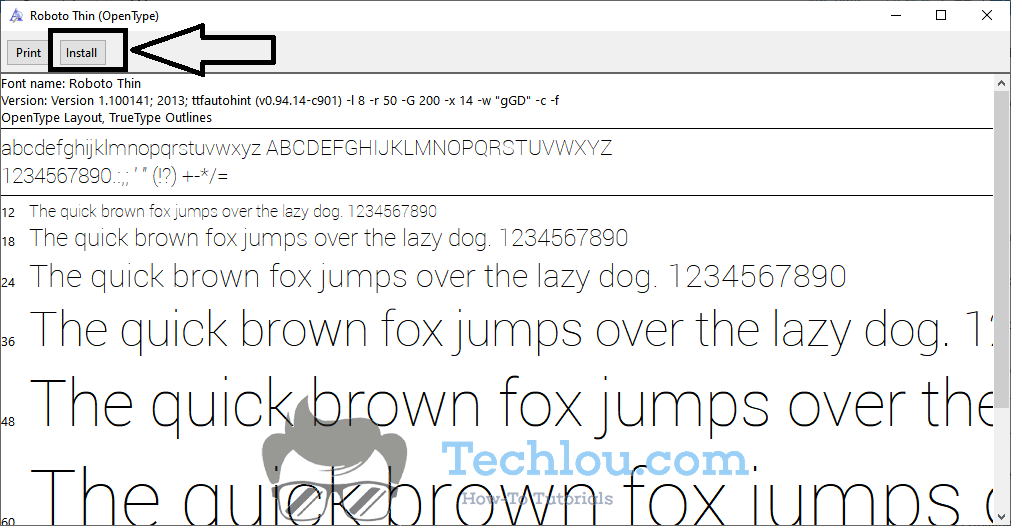
One way to add fonts in Windows 10 is to download and install them. To do that, double click on a font file (generally a .TTF or .OTF file) and click on “Install”.
How To Add A Font On Windows 10
Windows 10 includes a collection of fonts, however, you can add additional fonts downloaded from the Internet to your operating system to create original documents using more original fonts such as Bebas Neue or Lato. If you want to install fonts to your Windows 10 PC, follow the step-by-step guide below.
- Download a font from a website like Google Fonts or Dafont.com
- Unzip the zip file containing the font. Usually, two files are provided for each new font: an .OTF and a .TTF
- Double-click on one of the OTF or TTF files. A window showing a sample text will appear.
- Click on “Install” to add the font to Windows 10.

- Repeat the procedure with the other fonts you want to install.
That’s it, the new font is now copied and added to your Windows 10 system and you can use it in your installed softwares like Word, Photoshop, or Gimp.
How To Add Multiple Fonts At One In Windows 10
Installing fonts one by one can be very laborious when you have a lot of fonts to install. Fortunately, there is another method that allows you to install several fonts at once.
To install multiple fonts at once in Windows 10, follow this method:
- Download fonts websites like Google Fonts or Dafont.com
- Unzip the zip files containing the fonts.
- Press the Start button and start typing “Fonts“.
- Click on Fonts Settings

- Drag the font files to the “Drag and Drop to Install” box from File Explorer or the desktop.
- Your fonts will be installed and added to Windows 10 automatically.

With this method, you can install multiple fonts at once and save time when adding fonts to Windows 10.
How to remove a font on Windows 10?
If you have added a font that you no longer wish to use or you have installed too many fonts and it is slowing down your computer, then follow these steps to remove a font on Windows 10:
- Press Windows + I to open Windows 10 Settings.
- Go to Personalization > Fonts.
- Scroll down to the Available Fonts heading and find the font you want to uninstall.
- Select the font, then scroll down and click on Uninstall.
You need to restart your computer after deleting the font to apply changes to Windows.
If you have a lot of fonts, Windows may be slow to recognize them, especially if you have installed many fonts for different languages. If you know which font you want to use, just download and install the desired font.
How To Install Fonts In Windows 10 Using A Font Manager
Font managers are programs that simplify the process of adding new fonts to Windows 10. They’re created by developers and designers who understand all of the frustrations that designers face when trying to find the perfect font.
Font manager apps make it easy to see which fonts you have installed on your computer and how they work together. This is important because each font file on your computer takes up a certain amount of disk space, which can add up to a lot of space over time.
Font managers simplify the process of adding and removing fonts. They can keep track of all your fonts and allow you to install and uninstall them as needed.
There are three main benefits font managers offer:
- They allow you to manage all your fonts in one place.
- They make it easy for you to install and uninstall fonts.
- They prevent font conflicts.

FontBase is a font manager that allows you to easily install and uninstall new fonts on Windows 10, when you install fonts, they are copied to Windows 10 forever even if you don’t use them anymore, this takes up unnecessary space, slows down your computer when loading the list of fonts and makes you waste time looking for the right font to use on a large list of fonts that you don’t use.
What Is A Font ?
A font is a collection of characters (letters, numbers, punctuation marks, and so on) that a computer can display. Fonts are like patterns on clothing. Your computer needs to know a particular font so it can display text.
The way computers display text is called typography. You can say that typography is the study of how you put letters together.
When you type a document, your computer takes your text and converts it into strings of letters and numbers. Then it converts those strings into pixels, which are little dots of color.
Your computer converts your text into pixels. and use these pixels to show a font on your monitor. But the computer also does this so that you can print your document on physical paper.