Sometimes it is necessary to know how to set static IP in Ubuntu. Usually, an IP address is assigned to your PC automatically as soon as you connect to the network. This is done through a DHCP server that assigns your computer an automatic IP address in the network. But sometimes the DHCP server stops working or for some reason doesn’t provide you with an IP address, this will cause your computer to be out of the network and be unable to connect to the internet for example. Your only solution, in this case, is to know how to set a static IP Ubuntu to get your computer on the network. You can configure a static IP in ubuntu using the GUI or via the terminal.
How To Set Static IP In Ubuntu Using GUI
Using the GUI is the easiest way how to set static IP in Ubuntu when it has a GUI. This doesn’t require any technical knowledge and the procedure is pretty straightforward and similar to Windows.
Follow the steps below to set a static IP in Ubuntu using the GUI:
- Open the Ubuntu Settings
- On the left menu, click on Wi-Fi or Network depending on the type of network you are connected to.
- In the IPv4 tab, change the IPv4 method to “manual“
- Set your static IP address, Netmask and Gateway IP
- Click on Apply
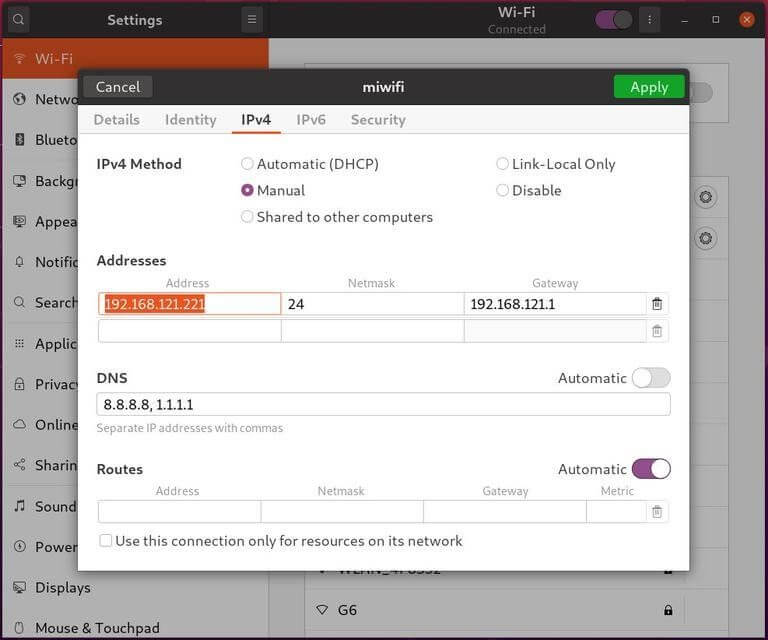
Make sure to set a correct static IP address, Netmask, and the correct gateway IP in Ubuntu GUI in order for your PC to successfully connect and reach your network.
To make sure that your new static IP configuration has been applied, open the terminal by pressing Ctrl+Alt+T or by clicking on the terminal icon and type this command:
$ ip addrThe output should be something like this
...
2: wlp1s0: <BROADCAST,MULTICAST,UP,LOWER_UP> mtu 1500 qdisc noqueue state UP group default qlen 1000
    link/ether 50:5b:c4:b8:42:3d brd ff:ff:ff:ff:ff:ff
    inet 192.168.121.221/24 brd 192.168.31.255 scope global dynamic noprefixroute wlp1s0
       valid_lft 38963sec preferred_lft 38963sec
    inet6 fe80::44e8:2fc:b039:664/64 scope link noprefixroute
How To Set Static IP In Ubuntu Using TERMINAL
You can set a static IP in Ubuntu using a terminal if your Ubuntu doesn’t come with a desktop. You can achieve this by using the Netplan utility.
Since Ubuntu 17.10, Netplan became the default network management tool, replacing the previous ifconfig utility which became obsolete.
Netplan uses .yaml configuration files written in YAML syntax to configure network interfaces. To set a static IP address in Ubuntu using Netplan you need to create a YAML description for the interface.
Follow the steps below to set static IP in Ubuntu using Netplan:
First, identify the network interface you want to configure using this command:
ip linkThis command returns a list of the available network interfaces. In our case, the name of the interface is ens3:
1: lo: <LOOPBACK,UP,LOWER_UP> mtu 65536 qdisc noqueue state UNKNOWN mode DEFAULT group default qlen 1000
    link/loopback 00:00:00:00:00:00 brd 00:00:00:00:00:00
3: ens3: <BROADCAST,MULTICAST,UP,LOWER_UP> mtu 1500 qdisc mq state UP mode DEFAULT group default qlen 1000
    link/ether 50:5b:c4:b8:42:3d brd ff:ff:ff:ff:ff:ff
Now that you have identified the interface you want to configure, you need to access the /etc/netplan folder where Netplan stores configuration files. You will find one or two files with names that differ from system to system but usually look something like 01-netcfg.yaml.
Open the YAML configuration file with your a text editor like nano:
sudo nano /etc/netplan/01-netcfg.yaml
Let’s explain this code before changing it.
network:
  version: 2
  renderer: networkd
  ethernets:
    ens3:
      dhcp4: yes
The Yaml configuration file starts with the “network” key that contains at least two mandatory keys. The first key is the version of the network configuration and the second is the device type key that can take one of these values ethernets, bonds, bridges, or vlans.
In this case, the configuration file also includes the renderer type wich is set by default to networkd if you have installed Ubuntu in server mode.
The most important part of this file is the ethernets key (In our case we are configuring an ethernet type connection). We can specify multiple network interfaces under ethernets but in our case, we have only one interface named ens3 that is currently configured to use DHCP to get an automatic IP address.
In this example, I will set this static IP address 192.168.86.64/24.
To set static IP address in Ubuntu using Netplan, edit the .yaml file as follows:
- Set dhcp4 to no
- Set a static IP address
192.168.86.64/24. Underaddresses: - Set the gateway
gateway4: 192.168.86.1 - Under
nameservers, set these IPaddresses: [8.8.8.8, 8.8.4.4]

Make sure that the indentation of the Yaml file is correct and follow the YAML sythax standards. The configuration will no take effect if the indentation is incorrect.
Once finished editing the .yaml file, save and close the file and apply the changes using this command:
sudo netplan apply That’s it! This is how to set static IP address in Ubuntu using Terminal and Netplan.
See also: WindowsFX, The Linux that Look EXACLTY Like Windows