Windows 10 not detecting the microphone is usually due to a permissions issue where apps do not have the necessary permissions to use the microphone. This problem can also be caused by the microphone being disabled or muted in Sound Settings or a faulty driver.
If you are unable to use voice chat apps like Skype, Messenger, or Discord because Windows 10 does not detect your microphone, then it becomes a serious problem. For communications-related jobs where you need to have the ability to communicate with others over the internet, this might be an issue. It can also be difficult to play online games for various reasons when your computer does not recognize that it is plugged in.
SOLUTION 1: Allow Apps To Access Microphone
Sometimes, there may be a lack of application permissions to use the microphone and Windows 10 will refuse to work with an error message stating that it cannot access the microphone. This can happen after an update where Windows may suggest that you block microphone . This will prevent apps from recognizing or accessing your microphone without your consent in order to protect you from spyware and malware that could activate and use your computer’s or headset microphone to listen in on you without your knowledge.
Although this option is very useful when it comes to security and privacy, it can result in a microphone detection problem when you try to use it on legitimate apps like Skype, Messenger, or Discord.
Follow the steps to allow apps to access the microphone:
Total Time: 1 minute
1. Click on the Start menu and open Settings
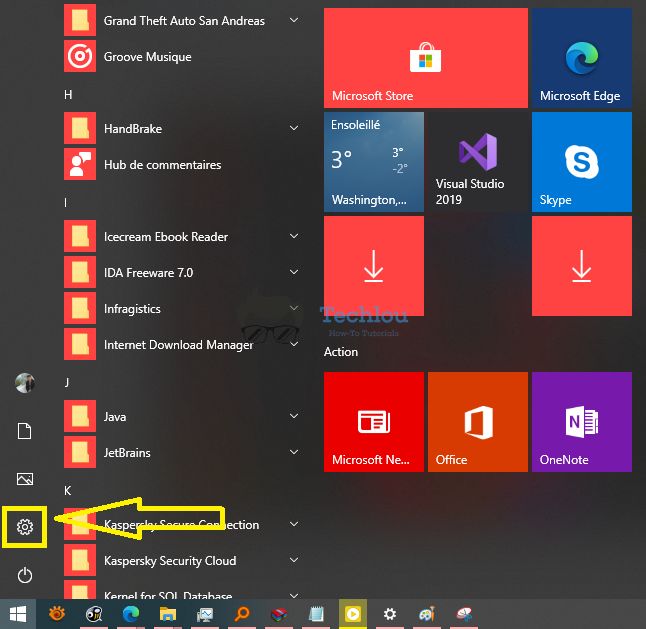
Left-click on the Start menu button then click on “Settings” to access Windows 10 settings.
2. Select Privacy
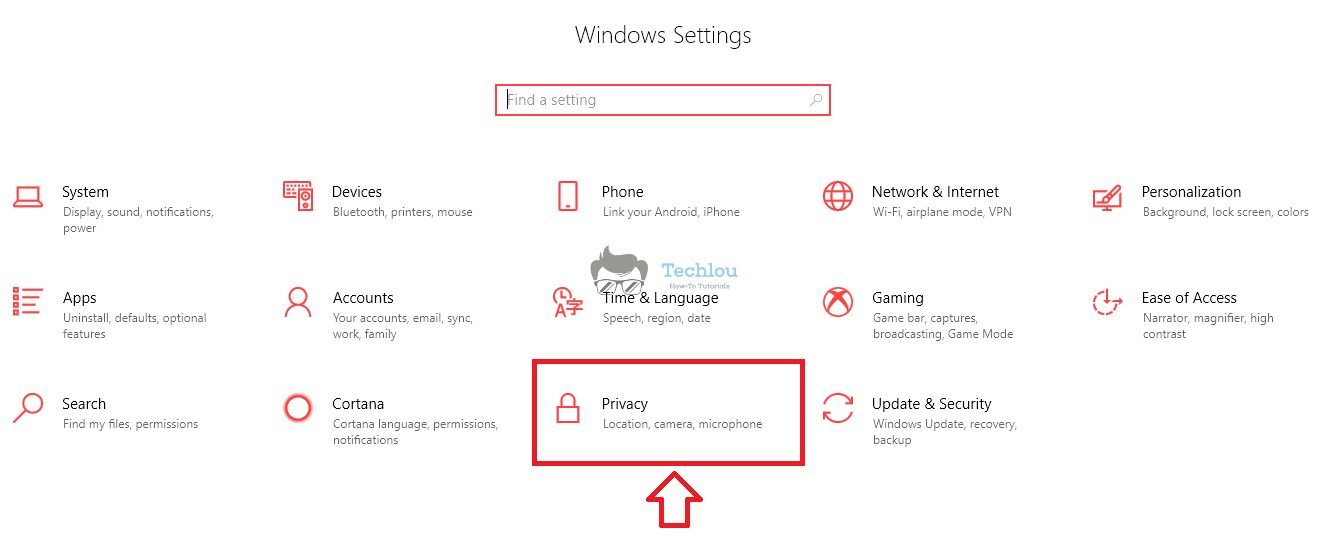
Click on Privacy to access Windows 10’s privacy settings which allows you to configure Windows and Apps permissions.
3. Click on Microphone
Under the Privacy menu, click on Microphone to open microphone permission settings.
4. Allow access to your Microphone
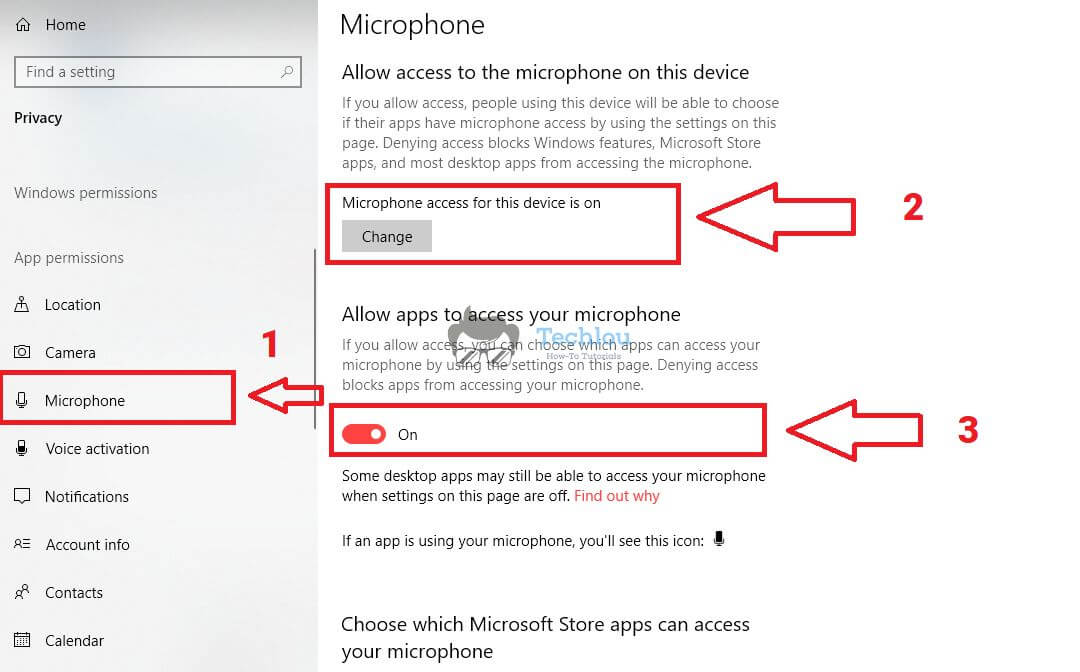
Under the Microphone menu, make sure that “Allow access to the microphone on this device” and “Allow apps to access your Microphone” options are ON.
After enabling access to the microphone on Windows 10 and allowing applications to access it you will be able to use it on software like Chrome or Skype. A small notification might be displayed asking you to allow the use of the microphone by an application or website whenever Windows detects that you are trying to use it, grant permission to allow using the microphone.
If your microphone appears to be working properly, the issue was most likely one of authorization, as programs cannot access your microphone.
SOLUTION 2: Check That the Microphone is Enabled and Not Muted In Sound Settings
If the microphone is not detected by Windows, make sure it is enabled, and not muted in Sound Options. You must first check that your microphone is selected as the input device and then check that it is properly configured.
Begin by following these steps to be certain your microphone is fully enabled and not muted:
- Open the Start Menu
- Start typing “Sound” and click on Sound Settings

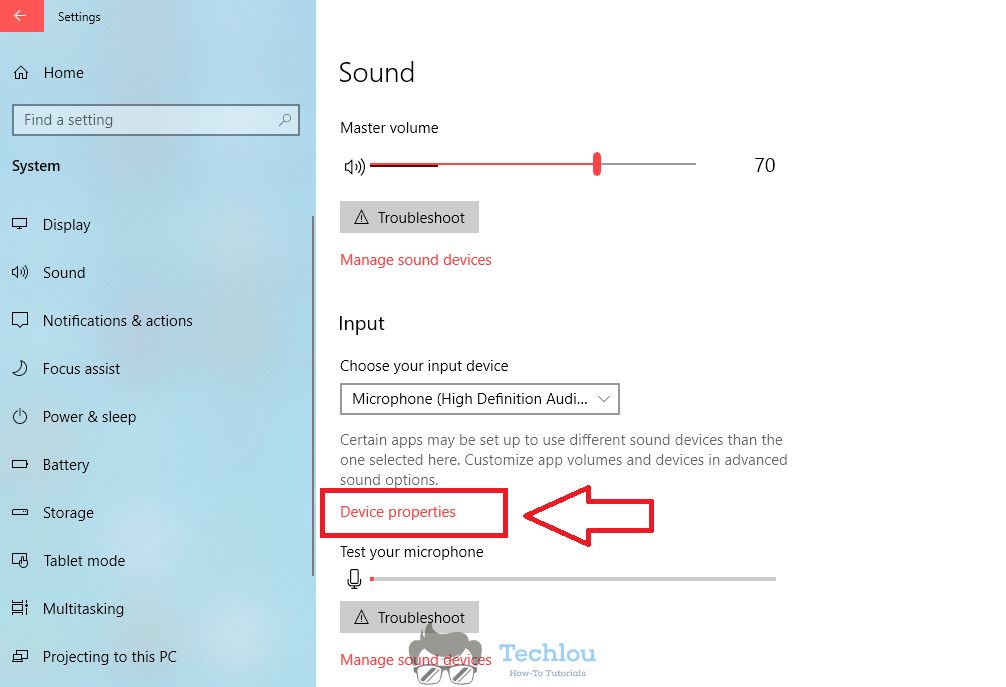
- Under “Input”, make sure that your Microphone is selected

- Click on Device Properties

- Make sure that the “Disable” option is off and the volume is set to 100%

After choosing the right microphone and ensuring that it is not deactivated and that its volume is set to 100%, the Windows 10 not detecting microphone problem should be resolved. If you’re using a headset, make sure you pick the right mic from the Input Device drop-down menu.
By pressing the TEST button and speaking into your headset or laptop microphone, you can see if your microphone is working properly. The microphone volume bar should move as you talk if your microphone is operating properly.
SOLUTION 3: Activate Microphone From Device Manager
Windows 10 won’t detect the microphone if the device is disabled in Device Manager. The microphone may have been intentionally or inadvertently disabled in the device manager. You can reactivate the microphone device from Device Manager by following these steps:
1.Open Device Manager
Click on the Windows button on your keyboard and start typing “device manager”, search for the Device Manager and click on it.

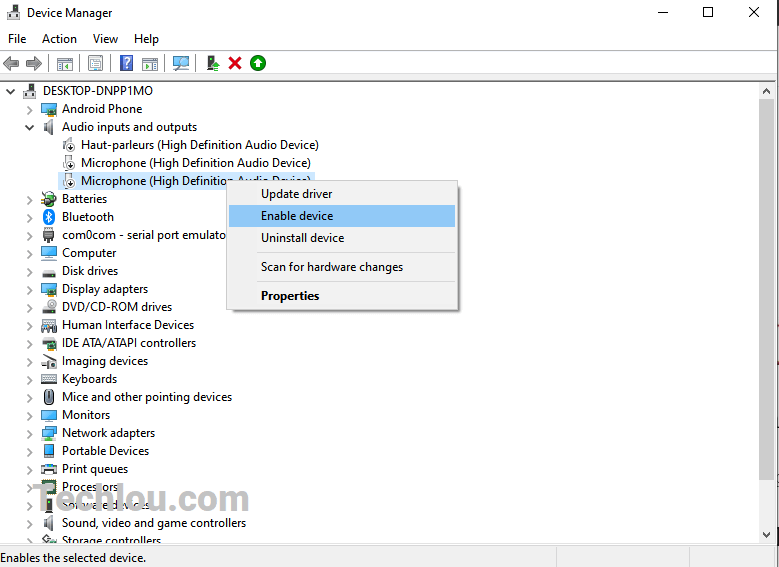
2.Expand the Audio inputs and outputs section
In the list of devices, click on the little arrow before “Audio inputs and outputs” to expand it
3.Right-click on your microphone device and click on Enable
In the list of Audio inputs and outputs devices, right-click on your microphone device and click on Enable
SOLUTION 4: Update Drivers
A driver problem may cause Windows not to detect your microphone. Make sure you have the latest drivers installed for your microphone or headset by using updating the drivers from the Device Manager or by downloading the drivers directly from the manufacturer’s website.
Follow the steps below to update your microphone drivers on Windows 10.
1.Open Device Manager
Click on the Windows button on your keyboard and start typing “device manager” and click on Device Manager

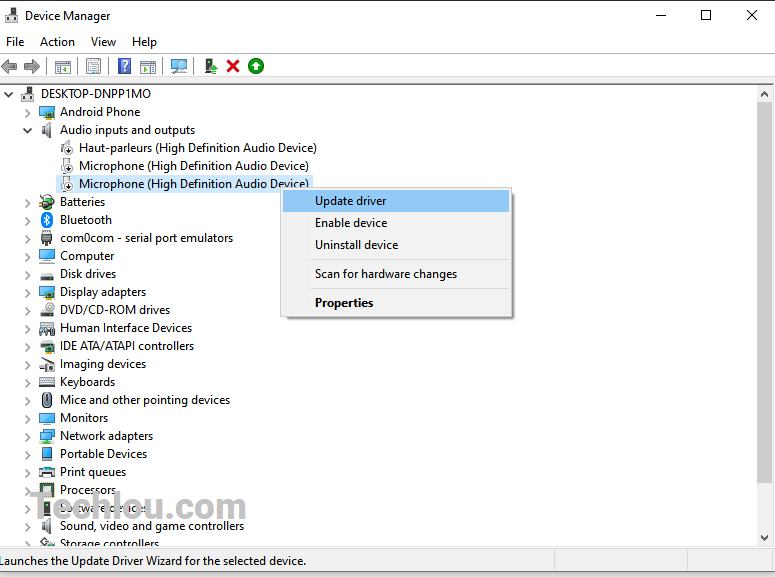
2.Right-click on your microphone device and click on Update
In the list of Audio inputs and outputs devices, right-click on your microphone device and click on Update driver
SOLUTION 5. Physically Check Your Microphone
If your microphone is not detected by Windows 10, make sure it is correctly attached to your computer; you may need to push it into the jack port a little to fully insert it. If you have a USB microphone, try a different port and see if the problem is caused by a bad USB port.
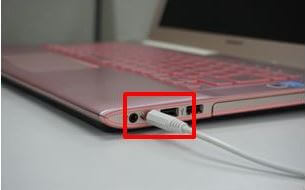
Make sure your microphone is not defective by testing it on your phone or another computer. If the microphone does not work on any other device, you should replace it with another microphone or headset.
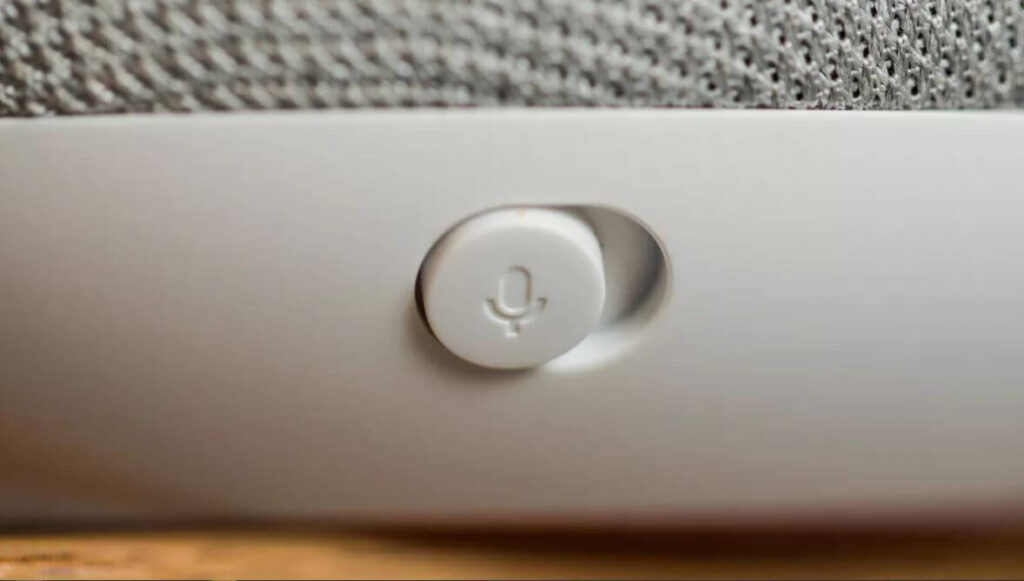
Every USB microphone is equipped with an ON/OFF button. This button controls the number of signals that are transmitted to the headphone jack. If you’re not hearing any sound through your headphones, make sure that the microphone is on and has not been accidentally turned off.
SOLUTION 6: Select The Right Microphone in Windows Settings
Your computer may have several microphone sources. For example, if you use a laptop and a headset, your computer can record using one of the two microphones.
Check-in Settings->Sound->Input that you have selected the right microphone to use. Some applications or sites ask you which microphone to use from their interference, select the right device each time.
You should also be aware that some software installs virtual devices such as microphones. You should never choose these devices as an input source in your applications or websites in order for your real microphone to work properly.
SOLUTION 7: User Windows Record Audio Troubleshooter
If none of the previous solutions worked, use Windows’s Record Audio Troubleshooter to have your system automatically look for problems preventing your microphone from working properly. To run Windows’s Record Audio Troubleshooter follow the steps below:
- Settings > Update & Security > Troubleshoot
- Select the “Recording Audio” troubleshooter
- Click on “Run the Troubleshooter“

See also:




![How To Monitor Kids iPhone [Ultimate Guide]](https://techlou.com/wp-content/uploads/2021/10/How-To-Monitor-kids-iphone-300x169.jpg)


